最近看完了《认知觉醒:开启自我改变的原动力》,写个读后感,算是对这本书部分内容的实践,也就是读是最浅层的,一些道理必须要思考和实践才能变成自己的。

这本书从人的大脑由本能脑、情绪脑、理智脑组成到分析人的行为与这些组成部分的关系,最后分析如何运用让自己变得更加优秀,讲了非常多以前不知道的东西,看下来非常有收获,印象最深的是以下三个点。

急于求成是人的本能

急于求成是我比较大的问题,事情都在追求快,觉得时间很宝贵,必须要在xx小时内完成,否则就是浪费时间,所以在遇到特别困难的点时总想着没时间了模棱两可的处理一下,最后做出来的东西其实自己也不是特别满意。

这本书里讲耐心是制胜的法宝,我非常认可,有时候慢就是快,慢下来多去思考,遇到困难就去把困难拆解,单独去解决,所有都解决了再在之前的基础上去做迭代优化,最后的成功想做的不好都难。

越能克服天性,耐心水平越高,越能成功。

构建清晰的目标

有时候行动力不强,是自己的目标不够明确清晰,想想也是,在早上拖延刷手机不起来学习最根本的原因我觉得一是要做的事情有很多,大脑很模糊,二是对自身的未来方向不够明确,信念不够强,比如我想做前端架构师,就得去拼命钻研开源项目源码、了解他们的思想,我不想成为平庸的人。有了信念加上清晰的目标,行动力会非常强大。

所以我每天晚上都会给第二天早上上班前的空闲时间定一个明确的目标,写具体事情的blog、手撕具体开源项目的源码,事情都确定下来。

刻意练习

一些道理和知识点在忽然get到的时候会非常开心,但其实这个时候不应该那么开心,因为这些东西还没有成为自己的。
在我们阅读鸡汤、技术博客/视频甚至学英语时了解到的内容必须要在日常中多实践,get到 -> 输出/思考 -> 反复实践才能成为自己的。

练习也是有技巧的,应当在舒适区边缘,内容既不要太难也不要太容易,假如太困难,可以拆解成一个个小问题逐一解决,也相当于在舒适区边缘。

studymethod

Update

急于求成为什么是本能,主要是多巴胺驱动我们要快速得到反馈,一旦反馈减少,多巴胺下降,就感觉不那么爽了。其实多巴胺好的一面是它会促成你尽快完成当前的目标,质量虽然没那么好,起码是完成了,但是对于我这样的程序员来说,有些复杂的东西比如性能优化、框架底层原理等等不掌握到90分深度还是不够,需要有面对长时间没有及时反馈的勇气,还需要信念、自我要求去驱动达成。

文章里的还有个点我觉得也蛮重要的,一篇或者或者一本书又或者工作了一天,其实只要有一两个重点能去把握住,深入思考、反复练习就够了,太多太杂最后反而什么事都做的不好,还是要专注。

最近在调研状态管理库,顺便研究了下Context(React 18.1)的原理,

以下解析基于该case

1
2
3
4
5
6
7
8
9
10
11
12
13
14
15
16
17
18
19
20
21
22
23
24
25
26
27
28
29
30
31
32
33
34
35
36
const dataContext = createContext();
const themeContext = createContext();
const Provider = ({ children }) => {
const [data, setData] = useState("This is the data!");
const dataContextValue = useMemo(() => {
return [data, setData];
}, [data, setData]);

return (
<themeContext.Provider value="dark">
<dataContext.Provider value={dataContextValue}>
{children}
</dataContext.Provider>
</themeContext.Provider>
);
};

const Consumer = () => {
const [data, setData] = useContext(dataContext);
const theme = useContext(themeContext);
return (
<React.Fragment>
<div>current theme is {theme}</div>
<button onClick={() => setData(Date.now())}>Click to change data!</button>
<div>{data}</div>
</React.Fragment>
);
};

const App = () => {
return (
<Provider>
<Consumer />
</Provider>
);
};

context在fiber上的结构

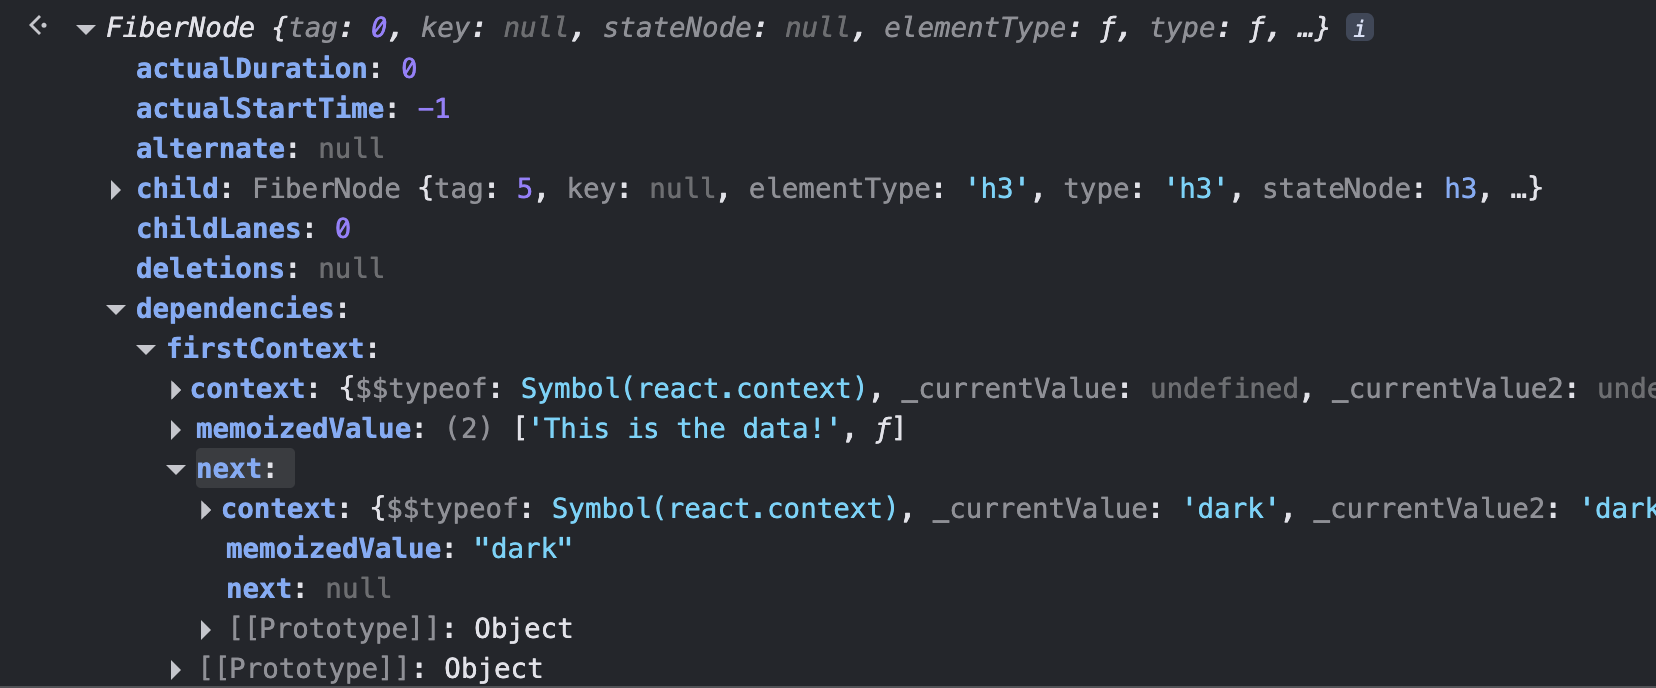
case中的Consumer组件使用了两个Context,context的存储也和别的hooks一样,是链表结构存储在fiber.dependency上。
context-chain

在Context value更新之后,是如何通知订阅该Context的组件更新的

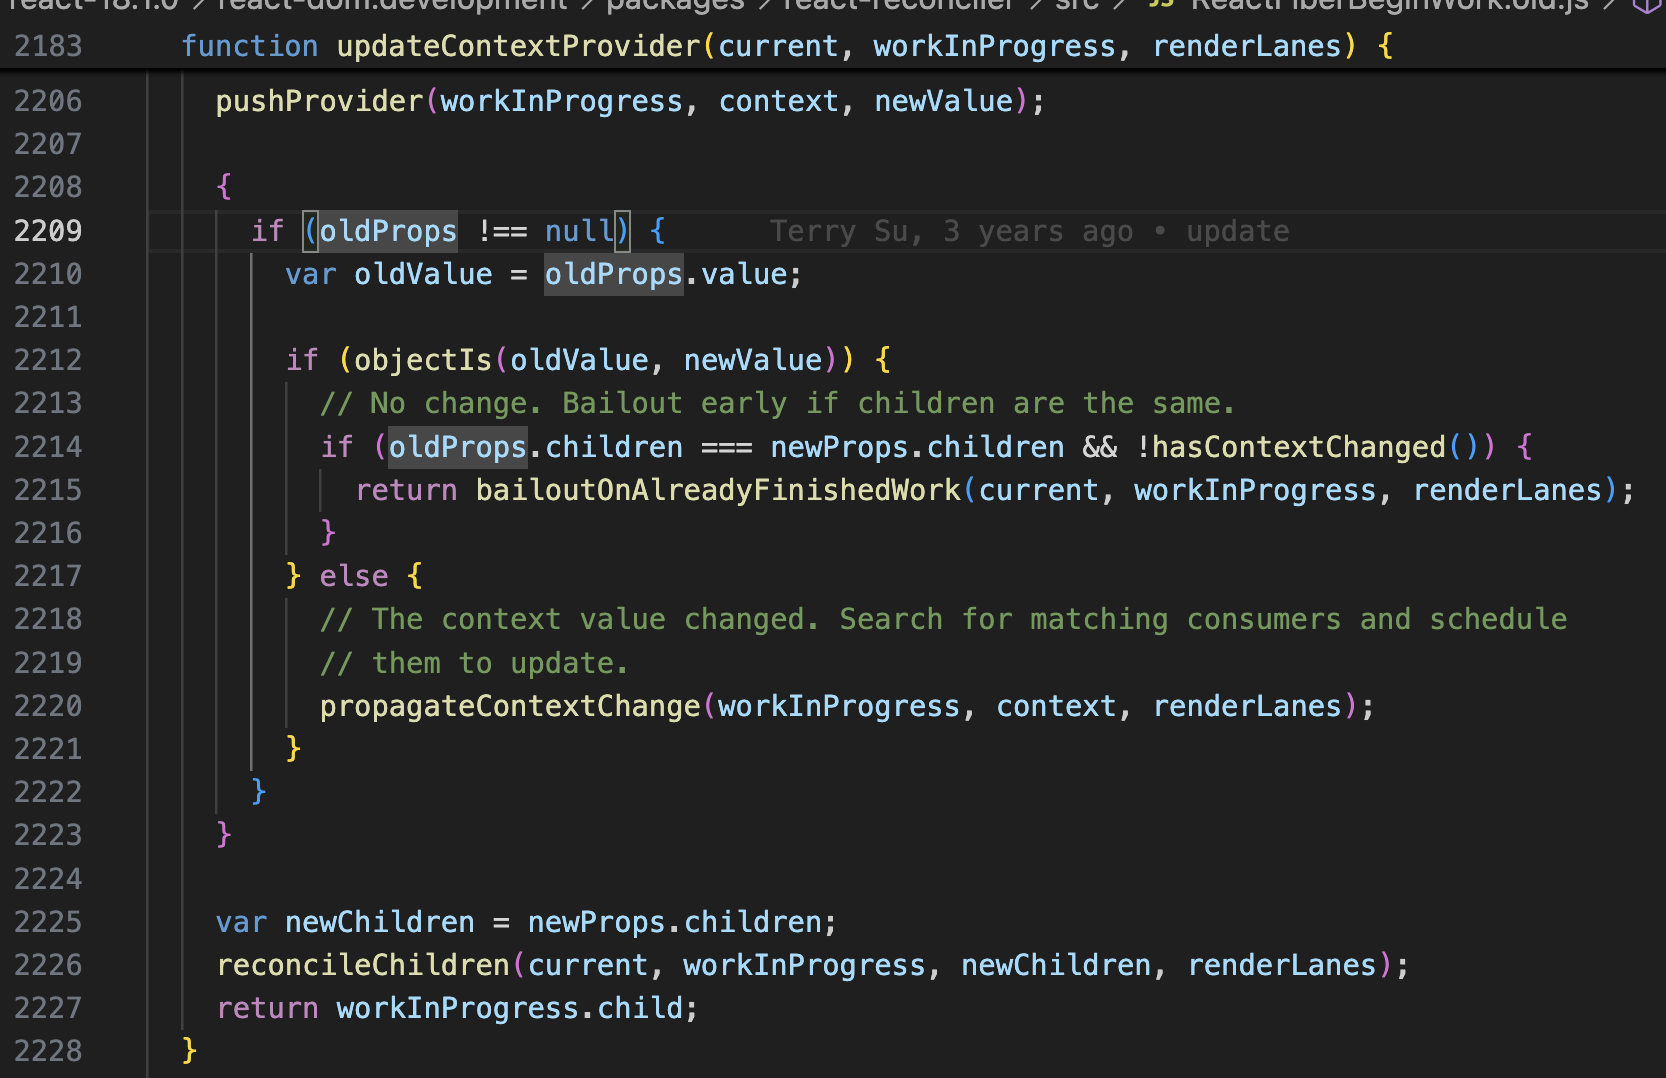
context value的更新一般是通过Provider所在组件通过setState触发,setState后整个React树从上而下进行reconciliation,在update Provider组件时发现value变更了,然后通知订阅方进行更新。
provider-reconcilation

如何通知相关联的组件
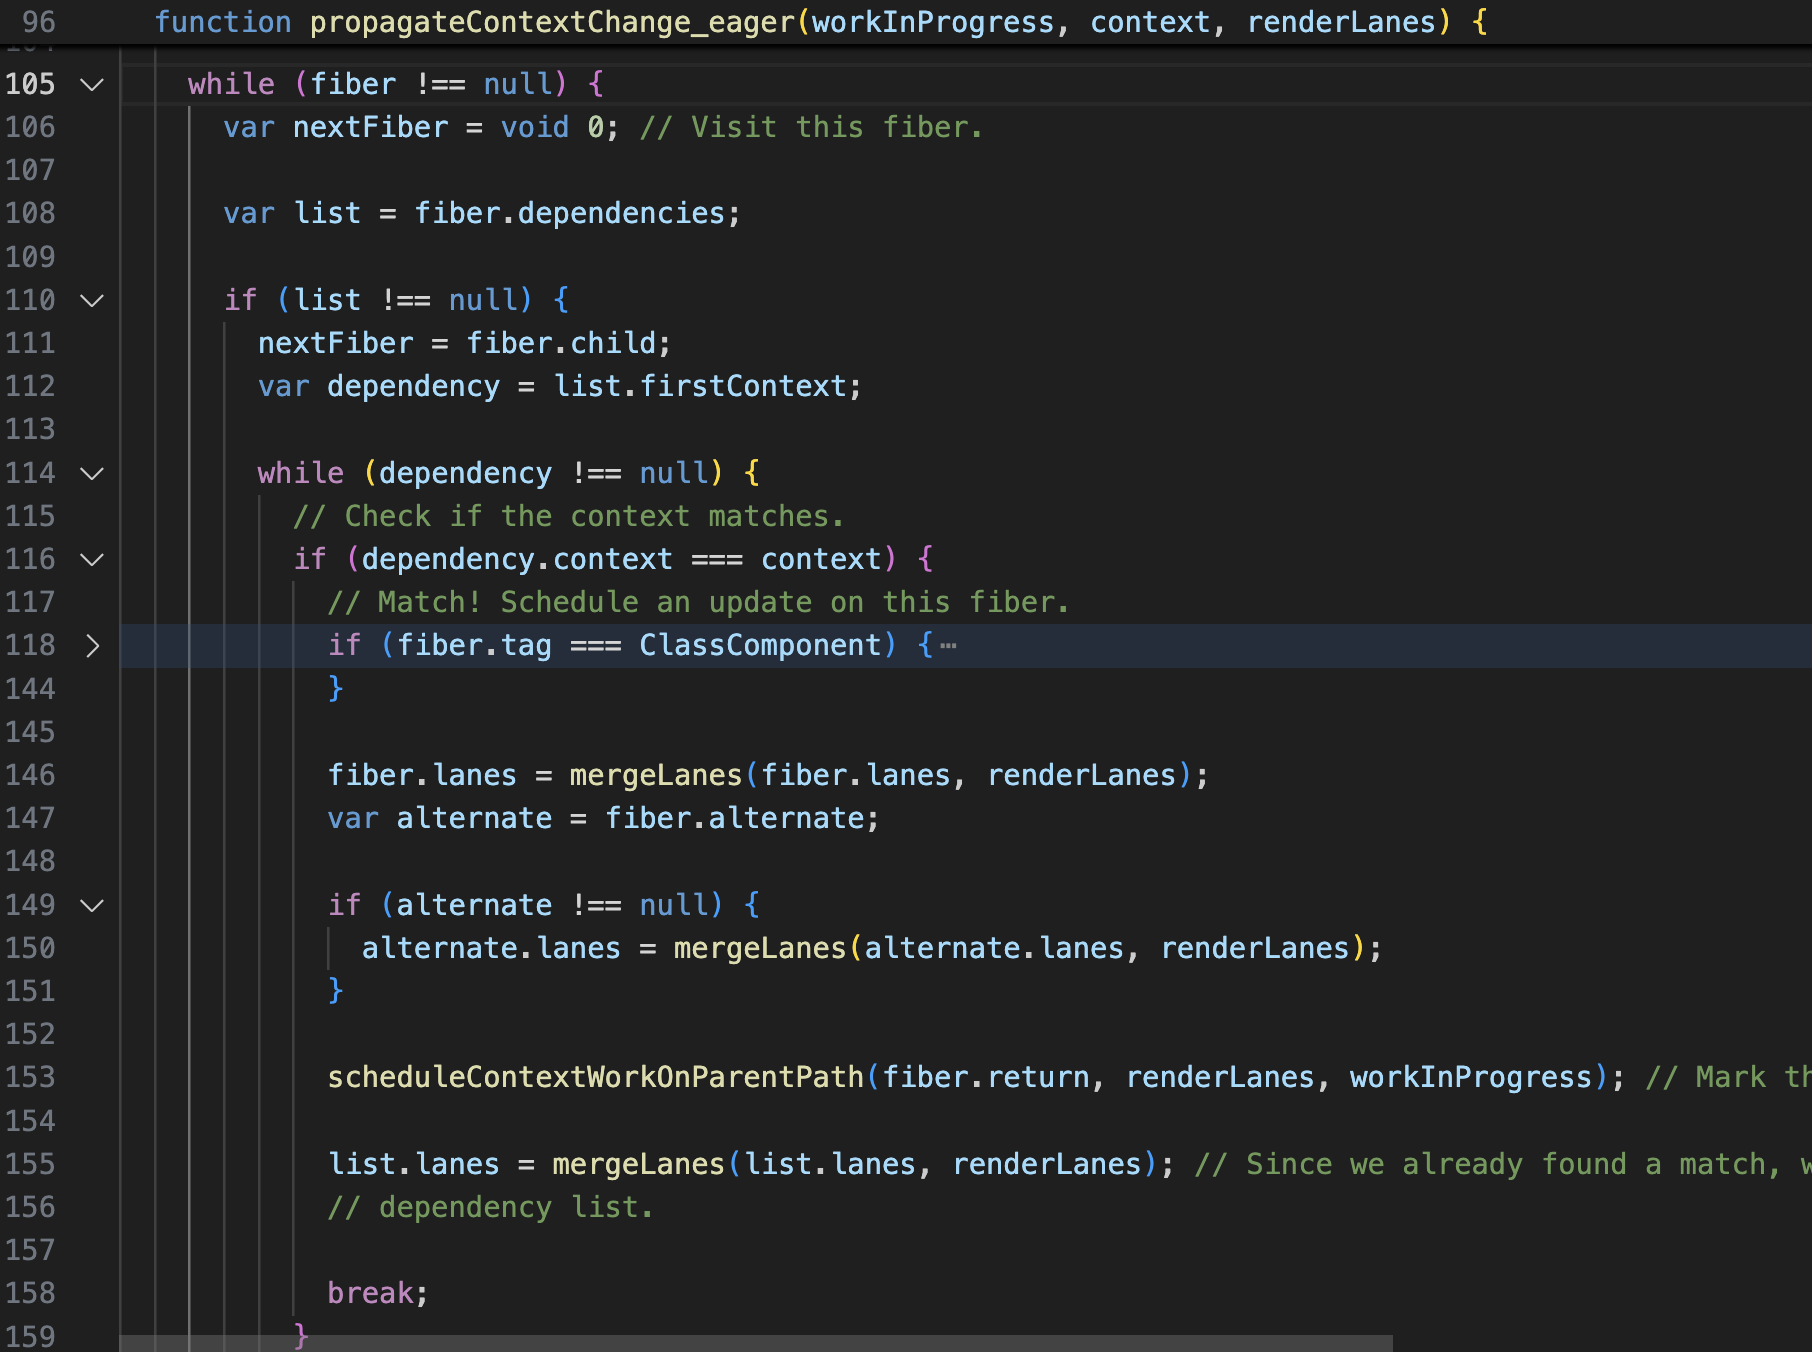
dfs遍历fiber tree,判断每个组件上的dependency链表包含了当前变更的context,发现有变更,将该fiber的lane与当前的更新优先级renderLane合并,后续在reconcile该组件时就会判断fiber上是否包含renderLane来决定该fiber是否需要更新
context-change-notify

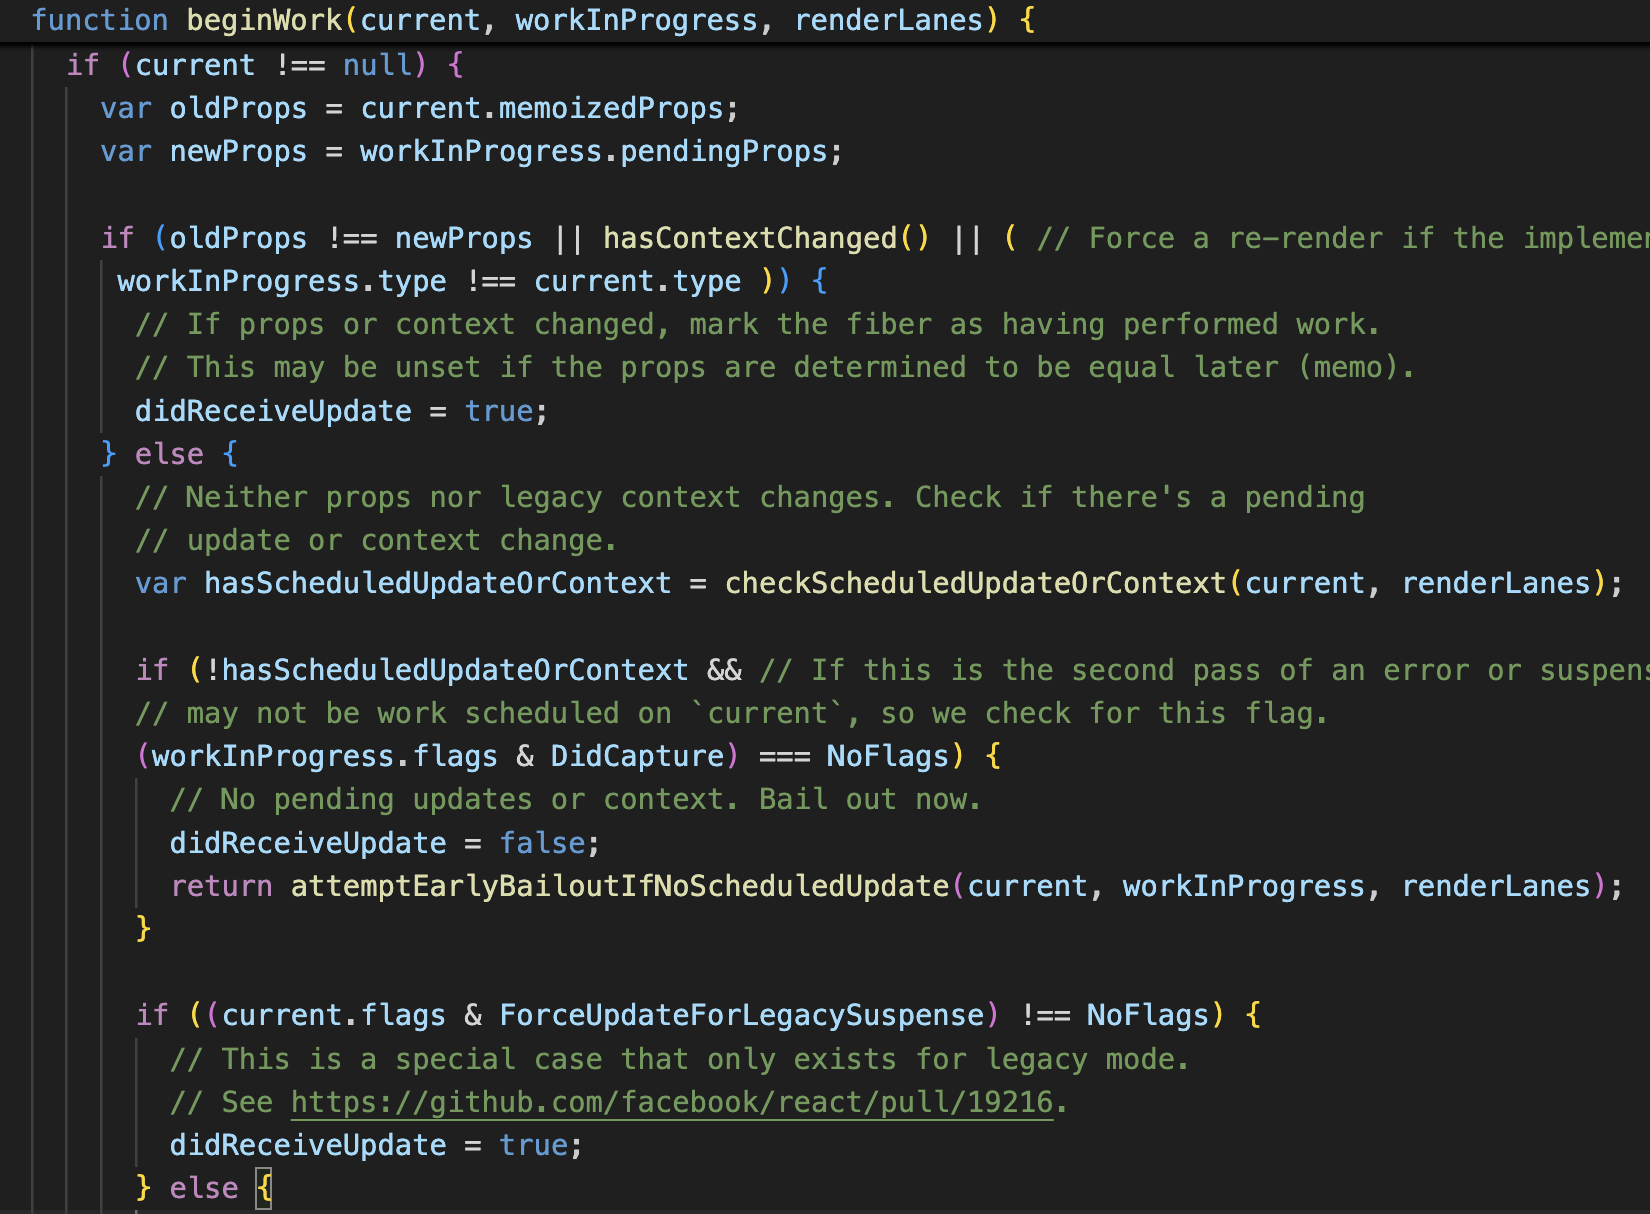
判断是否有update
update-component

多个相同 Provider 可以嵌套使用,里层的会覆盖外层的数据的实现原理

React通过堆栈来实现,在reconcile Provider时会将最新的value赋值到context上,将旧值存储到站栈里,在完成对Provider的reconcilation(completeWork)后,将旧值pop出来作为context.value。

1
2
3
4
5
6
7
8
9
10
11
12
13
function pushProvider(providerFiber, context, nextValue) {
push(valueCursor, context._currentValue, providerFiber);
context._currentValue = nextValue;
}
function popProvider(context, providerFiber) {
var currentValue = valueCursor.current;
pop(valueCursor, providerFiber);
if ( currentValue === REACT_SERVER_CONTEXT_DEFAULT_VALUE_NOT_LOADED) {
context._currentValue = context._defaultValue;
} else {
context._currentValue = currentValue;
}
}

全局状态的合理使用

因为context value的变更会遍历所有的fiber,如果页面很复杂,组件层级很深数量庞大,开销也是很大的。

所以在给Provider设置value时应该用useMemo(value)以及减少value的变化。

React Redux 是如何设计 Provider 的?

React Redux 的 Provider 接收 store,而 store 在创建初期就保持不变,因此 Provider 的 store 在整个应用生命周期内都不会发生改变,也就不会触发订阅的组件重新渲染。

我们通过 dispatch 触发的状态变更,实际上改变的是 store.state,然后通过 useSelector 或者 connect 订阅。

介绍

Zustand是最近比较火的状态管理库,是Redux的替代品,相比于Redux,它的api简单,样板代码少,包体积小只有1.2KB(minified),基于hooks来管理状态以及生态也比较丰富,有immer、persist、redux等中间件。

原理

src/vanilla.ts中的代码如下,vanilla的意思是这里导出的createStore各框架都能用,而非仅限于React。
源码比较简单,核心是基于发布订阅模式和useSyncExternalStore实现的。

1
2
3
4
5
6
7
8
9
10
11
12
13
14
15
16
17
18
19
20
21
22
23
24
25
26
27
28
29
30
31
32
33
34
35
36
37
38
39
40
41
42
43
44
45
// src/vanilla.ts
const createStoreImpl: CreateStoreImpl = (createState) => {
type TState = ReturnType<typeof createState>
type Listener = (state: TState, prevState: TState) => void
let state: TState
// 订阅者,包含了每个组件通过useSyncExternalStore绑定的重新渲染的方法
const listeners: Set<Listener> = new Set()

// 变更状态,可以只变更部分state,会做合并
const setState: StoreApi<TState>['setState'] = (partial, replace) => {
const nextState =
typeof partial === 'function'
? (partial as (state: TState) => TState)(state)
: partial
if (!Object.is(nextState, state)) {
const previousState = state
state =
(replace ?? (typeof nextState !== 'object' || nextState === null))
? (nextState as TState)
// 更新state时用的是Object.assign,更改了state的引用,所以在使用state时,需要用selector或者useShallow。
: Object.assign({}, state, nextState)
// setState时触发更新
listeners.forEach((listener) => listener(state, previousState))
}
}

// getState方法实则是返回当前Store里的最新数据
const getState: StoreApi<TState>['getState'] = () => state

const getInitialState: StoreApi<TState>['getInitialState'] = () =>
initialState

const subscribe: StoreApi<TState>['subscribe'] = (listener) => {
listeners.add(listener)
// Unsubscribe
return () => listeners.delete(listener)
}

const api = { setState, getState, getInitialState, subscribe }
const initialState = (state = createState(setState, getState, api))
return api as any
}

export const createStore = ((createState) =>
createState ? createStoreImpl(createState) : createStoreImpl) as CreateStore

在React中集成

1
2
3
4
5
6
7
8
9
10
11
12
13
14
15
16
17
18
19
20
21
22
23
24
25
26
27
28
// src/react.ts
export function useStore<TState, StateSlice>(
api: ReadonlyStoreApi<TState>,
selector: (state: TState) => StateSlice = identity as any,
) {
// 挂载组件更新的方法
const slice = React.useSyncExternalStore(
api.subscribe,
() => selector(api.getState()),
() => selector(api.getInitialState()), // getServerSnapshot
)
React.useDebugValue(slice)
return slice
}

const createImpl = <T>(createState: StateCreator<T, [], []>) => {
const api = createStore(createState)

const useBoundStore: any = (selector?: any) => useStore(api, selector)

// 在store上挂载setState, getState, getInitialState, subscribe 这些方法
Object.assign(useBoundStore, api)

return useBoundStore
}

export const create = (<T>(createState: StateCreator<T, [], []> | undefined) =>
createState ? createImpl(createState) : createImpl) as Create

可以看到,Zustand是对useSyncExternalStore进行了封装,将状态统一管理在组件外部,避免了层层传递 Props。这种方式使得状态管理更加灵活,开发过程更加高效。

与Redux的对比

  1. Zustand相对于Redux需要较少的代码,并且上手成本低
  2. 定义衍生状态,Redux通过自定义hook/或者mapStateToProps实现,Zustand可以定义computed属性,相对来说比较方便。
  3. Redux是单一store,Zustand可以是多Store

与MobX的对比

  1. 没有computed缓存
  2. 更新粒度没有MobX细,开发时需要考虑如何避免重复渲染。
  3. 代码相对于MobX Store来说不够直观
  4. 体积小,Zustand + immer之后是14KB,mobx + mobx-react + mobx-react-lite是35KB
  5. 设置新状态需要用set(state => newState)的方式,没有MobX来的直接并且符合直觉。
  6. 避免re-render不需要selector,心智负担更小,代码量更少。

如果不考虑体积,我觉得可以直接选MobX。

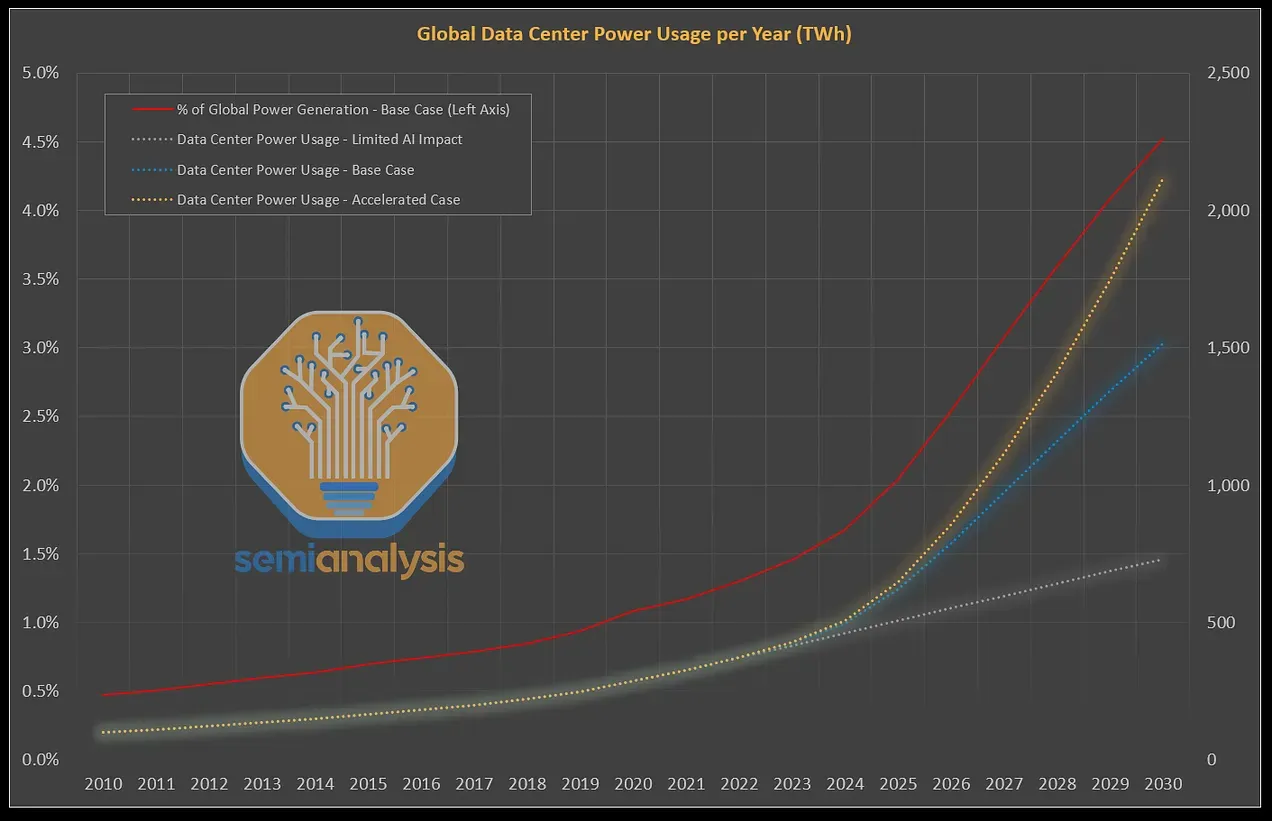
这几年AI发展迅速,算力需求爆炸式增长,能源是AI发展的瓶颈之一。

全球能源

发电结构

中国:煤炭58.2%,天然气3.0%、太阳能8.3%、风电9.8%、水电13.5%、核能4.4%.
美国:天然气 43%、核能 19%、煤炭 16%、风能 10%、水力发电 6% 和太阳能 4%。
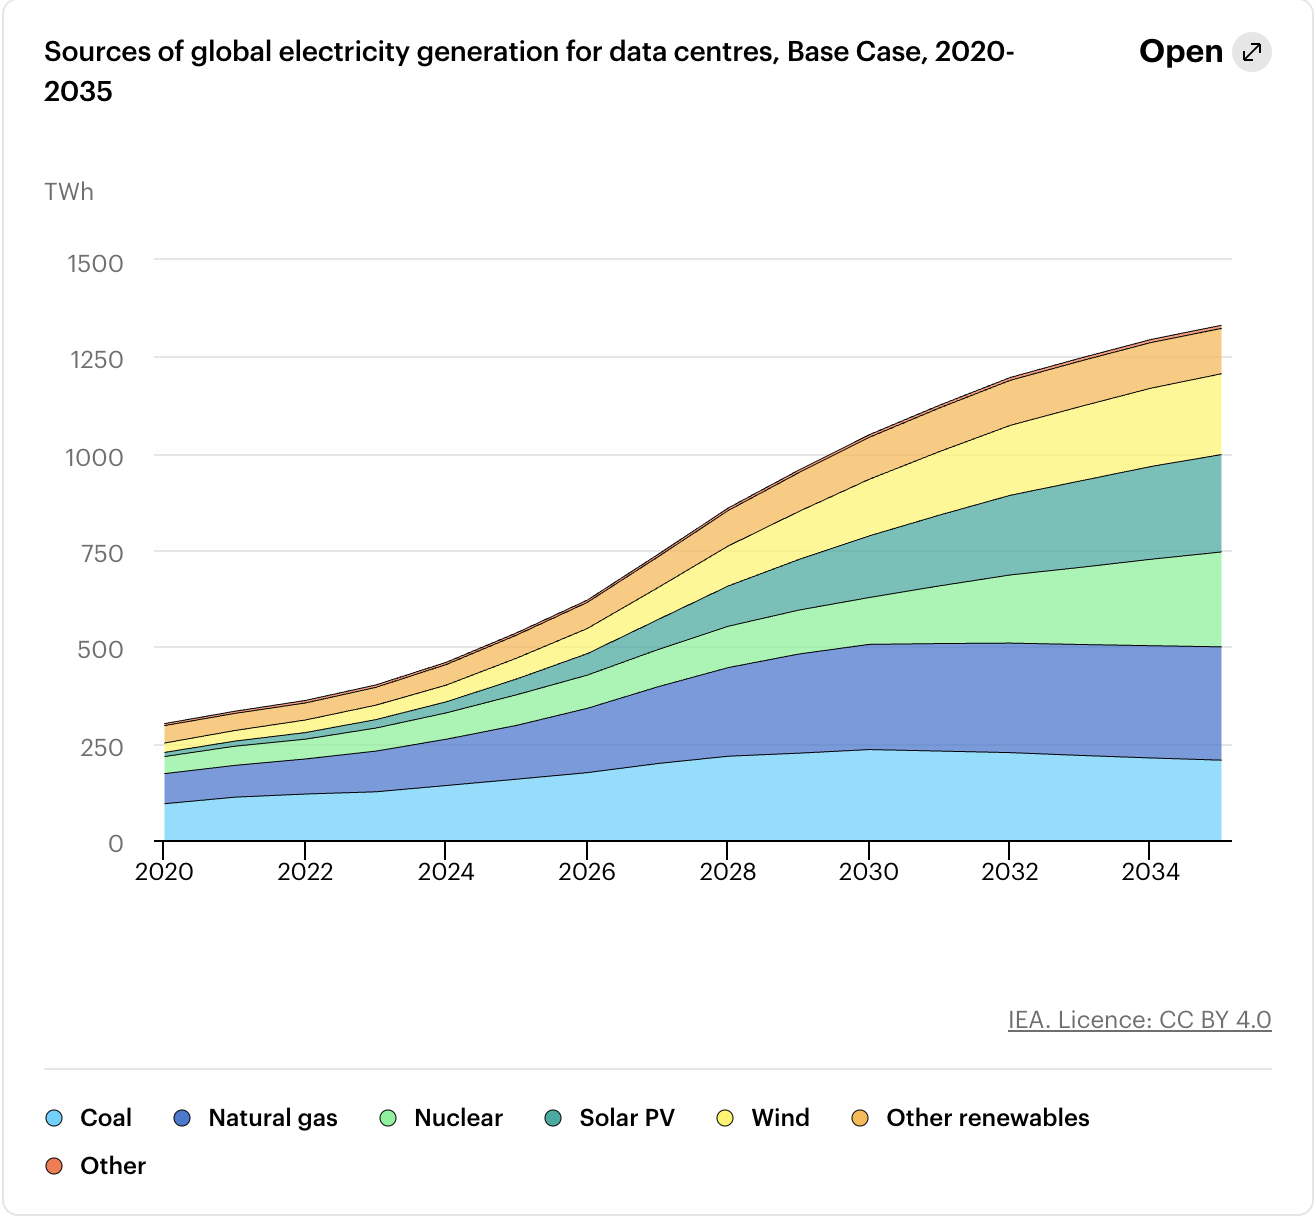
全球:煤炭约占30%,是最大的电力来源,但各地区差异很大,其中中国的贡献最大。可再生能源(主要是风能、太阳能光伏和水力发电)目前供应着全球数据中心约27%的电力。天然气是当今第三大电力来源,满足了26%的需求,其次是核能,占15%。

未来:可再生能源仍然是数据中心增长最快的电力来源。未来五年,可再生能源将满足近一半的新增需求,其次是天然气和煤炭,而核能将在本十年末及以后开始发挥日益重要的作用。

全球电力生成
electric-generation
全球电力使用情况
power-usage
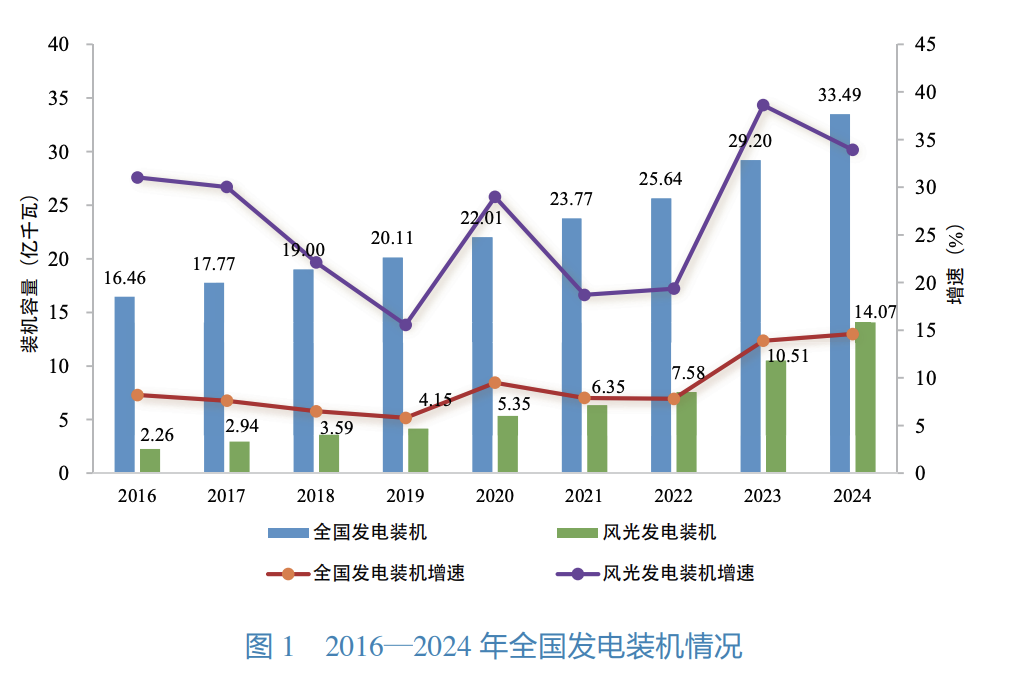
中国电力装机容量
china-power-generation-installed
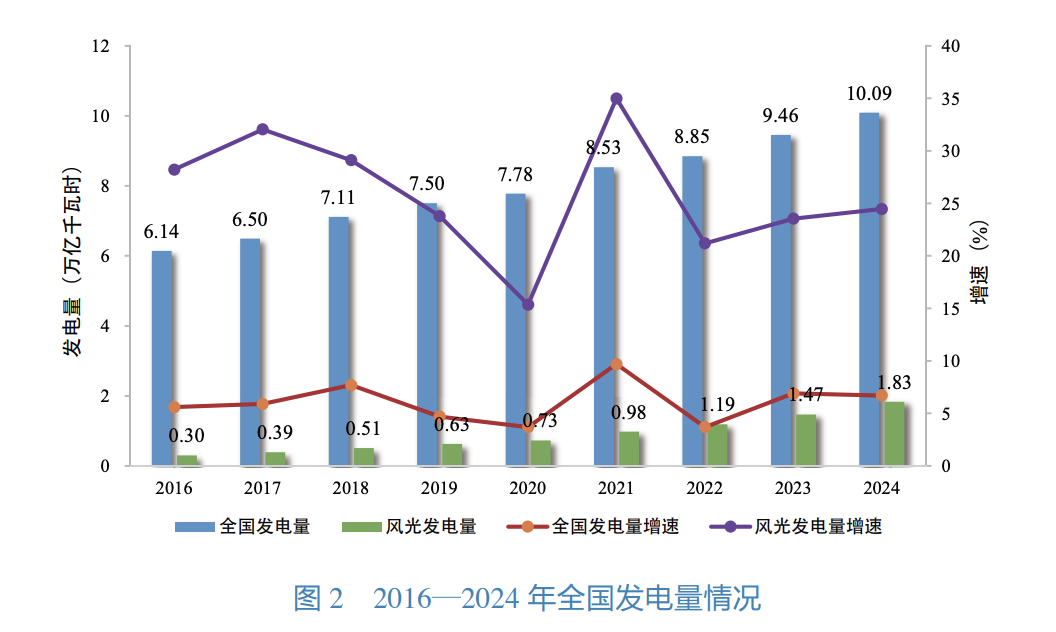
中国电力生成
china-electric-generation
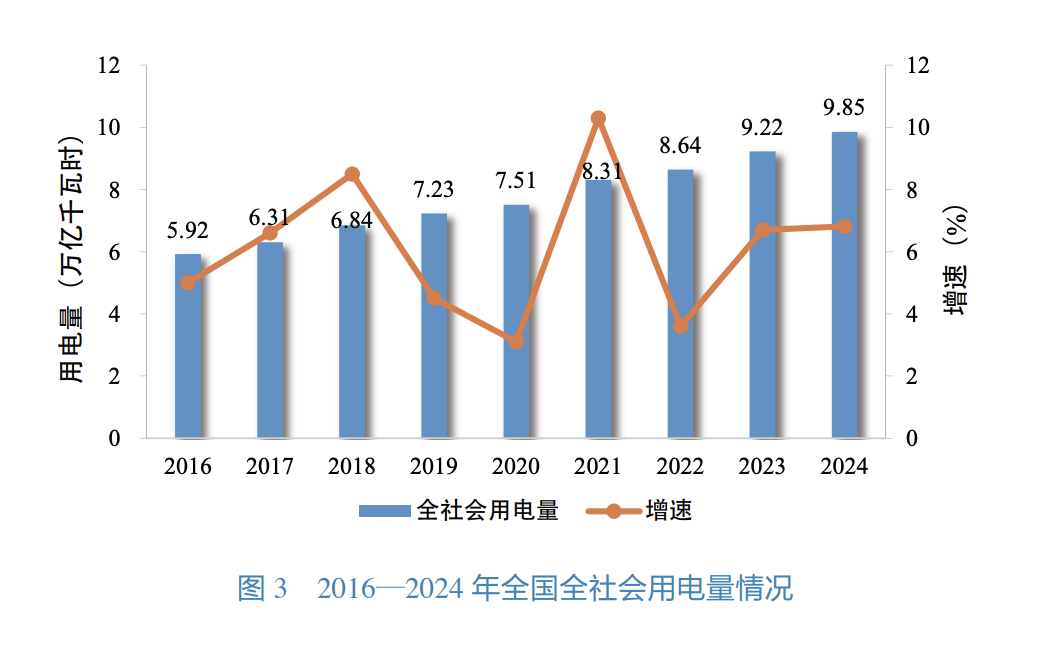
中国电力使用
china-power-usage

数据中心简史

20 世纪 90 年代,随着互联网的发展,我们需要处理日益增长的互联网数据,数据中心和云计算兴起。
2006年,随着亚马逊网络服务的发布,数据中心的低迷局面开始扭转。自那时起,美国数据中心的容量基本稳步增长。
2023 年,当时人工智能热潮席卷而来。 目前估计,到 2030 年,数据中心容量将翻一番。
AI 训练的独特工作负载促使人们重新关注数据中心的规模。计算基础设施越紧密,性能就越高。此外,当数据中心被设计为计算单元,而不仅仅是服务器机房时,企业可以获得额外的集成优势。
因为AI模型训练不需要靠近最终用户,因此训练相关的数据中心可以在任何地方建立。

建数据中心需要什么

设备

  1. 电气设备和冷却设备
    电气设备首先由连接外部能源的主开关设备组成。然后,主开关设备连接到配电单元、不间断电源 (UPS) 以及连接服务器机架的线缆。大多数数据中心还会配备柴油发电机,作为停电时的备用电源。
    冷却设备。这包括冷水机组、冷却塔、暖通空调设备以及连接到服务器本身的液体或空气冷却设备。

  2. GPU和AI accelerator
    AI训练、推理、计算

  3. CPU
    复杂运算和委派任务

  4. 数据存储

动力

  1. 能源
    化石燃料、可再生能源、核能

  2. 输电
    高压线路、变压器、变电站

    ai-datacenter-power-tranport

快速提升能源容量并不是简单的事,数据中心有两种选择,并网能源和离网能源。并网能源通过电网,由公用事业公司分配。离网能源则绕过电网,例如现场太阳能、风能和电池。并网能源面临的问题在于,扩大电网容量所需的时间平均为50个月(2023年)。因此,近期仍以化石燃料发电为主。

数据中心的耗电量,从 2001 年的几兆瓦 ,到 2010 年代的 50 兆瓦 ,再到 2020 年的“120 兆瓦”巨型数据中心 ,再到如今的千兆瓦级。所有科技公司都更倾向于使用并网电力,AWS 正在印第安纳州投资 110 亿美元建设一个数据中心园区 ,并建设四个太阳能发电场和一个风力发电场为其供电。
长效电池创新将是可再生能源向前迈出的重要一步。太阳能和风能的问题在于它们不稳定;它们只在有风或阳光充足时提供能源。长效电池有助于解决这个问题,它在能源过剩时储存能源,在能源短缺时释放能源。
储能有多种方式,国内外基本都是抽水储能为主,其余通过电池、热能存储、压缩空气和飞轮储能。

核能: 短期不太可能解决能源危机,耗时较久,国内5-10年,美国最近的核电站耗时 11 年,耗资超过 300 亿美元建成。

相关资料

人工智能数据中心入门:https://www.generativevalue.com/p/a-primer-on-ai-data-centers
AI 数据中心(二):能源 https://www.generativevalue.com/p/ai-data-centers-part-2-energy
2024年能源数据 https://ember-energy.org/data/yearly-electricity-data/
数据中心和能源 https://www.youtube.com/watch?v=b6uCUuQwEog
美国发电结构 https://www.eia.gov/tools/faqs/faq.php?id=427&t=3
2024年中国年度电力市场报告 https://www.nea.gov.cn/20250717/54ae0fdb11f04b39a5b670999c04ef81/2025071754ae0fdb11f04b39a5b670999c04ef81_19fe782a11f3aa40209907a80e3e692150.pdf
iea2025年发布的能源与AI报告 https://www.iea.org/reports/energy-and-ai
AI数据中心能源困境——AI数据中心空间的竞争 https://semianalysis.com/2024/03/13/ai-datacenter-energy-dilemma-race/#ai-demand-vs-current-datacenter-capacity

Playwright-MCP原理

Playwright有一个page._snapshotForAI方法,为html生成如下格式的字符串,基于html的aria也就是语义生成的,每个节点有个ref,ref是唯一的,元素的实现是通过这个ref来实现。

以下是通过page._snapshotForAI方法为 https://playwright.dev/ 生成的部分字符串

1
2
3
4
5
6
7
8
9
10
11
12
13
14
15
16
17
18
- generic [ref=e2]:
- region "Skip to main content":
- link "Skip to main content" [ref=e4] [cursor=pointer]:
- /url: "#__docusaurus_skipToContent_fallback"
- navigation "Main" [ref=e5]:
- generic [ref=e6]:
- generic [ref=e7]:
- link "Playwright logo Playwright" [ref=e8] [cursor=pointer]:
- /url: /
- img "Playwright logo" [ref=e10] [cursor=pointer]
- generic [ref=e11] [cursor=pointer]: Playwright
- link "Docs" [ref=e12] [cursor=pointer]:
- /url: /docs/intro
- link "API" [ref=e13] [cursor=pointer]:
- /url: /docs/api/class-playwright
- button "Node.js" [ref=e15] [cursor=pointer]
- link "Community" [ref=e16] [cursor=pointer]:
- /url: /community/welcome

缺点

  1. 假如网站内容多,生成的snapshot就很大,与大模型交互的所需要的token就多,会存在费用高,token数限制的问题。
  2. 假如网站没做好aria无障碍,可能会存在识别精度低的问题。

与Midscene.js的区别

  1. 定位准确度
    整体差不多,Playwright-MCP为每个节点生成ref,基于ref定位,而Midscene.js基于视觉大模型获取boundingBox,然后进行范围匹配,都是通过大模型语义识别。

  2. 可定位区域
    Playwright-MCP支持整个网站,Midscene.js基于可视区域,假如有个按钮在弹窗下面,Midscene.js就无法识别了。

  3. 定位速度
    Playwright-MCP较快,两个case 5s内完成了,但Midscene.js基于视觉大模型,速度较慢,本地试了下平均一个请求5-10s。

  4. 测试报告
    Midscene.js有完善的用例报告回放,Playwright-MCP需要自己去接入或者实现一套。

最近浏览器agent例如Midscene.js、stagehand很火,好奇去体验了下然后了解了下原理。

浏览器agent是什么

浏览器agent就是用户用自然语言跟浏览器对话,浏览器会自动执行一些操作、爬虫、断言,类似传动UI自动化、RPA解决重复劳动的问题。

与传统UI自动化、RPA的区别

传统的UI自动化都是用硬编码获取元素,假如页面改动频繁,后续的维护成本非常高,但是浏览器agent能够适应经常变动的内容。

实现原理

假如我想要的人工地操作”在搜索框输入 “耳机” ,敲回车”,主要有以下几个步骤:

  1. 定位搜索框
  2. 输入”耳机”
  3. 敲回车

那么浏览器agent也一样需要执行这三个步骤

  1. 根据网页显示,获取搜索框dom元素,并focus
  2. 执行输入”耳机”操作
  3. 按下 回车键

Midscene.js是如何执行这三个操作的

根据屏幕截图,获取搜索框DOM元素,并focus

将screenshotBase64和prompt发送给视觉语言大模型,要求返回如下结构

1
2
3
4
5
6
7
8
9
10
11
12
13
14
15
{
"what_the_user_wants_to_do_next_by_instruction": "在搜索框输入 '耳机' ,敲回车",
"log": "Now I want to use action 'Input' to enter '耳机' in the search bar first.",
"more_actions_needed_by_instruction": true, // 是否还需要进行操作
"action": {
"type": "Input",
"locate": {
"bbox": [269, 57, 824, 87],
"prompt": "The search input field"
},
"param": {
"value": "耳机"
}
}
}

根据bbox和DOM tree进行深度遍历 DOM节点范围匹配,得到范围最相近的DOM元素,当前是input元素,清空input中的内容。

根据上一步的more_actions_needed_by_instruction判断是否还需要继续调用AI

执行将上一步后将上一步的log和prompt发送给大模型,返回如下

1
2
3
4
5
6
7
8
9
10
11
{
"what_the_user_wants_to_do_next_by_instruction": "在搜索框输入 \\"耳机\\" 后,需要敲回车来执行搜索。",
"log": "现在我将使用 'KeyboardPress' 动作来模拟敲击回车键以执行搜索。",
"more_actions_needed_by_instruction": false,
"action": {
"type": "KeyboardPress",
"param": {
"value": "Enter"
}
}
}

执行KeyboardPress操作

实现的伪代码

1
2
3
4
5
6
7
8
9
10
11
12
13
14
15
16
17
18
19
20
21
22
23
24
25
26
27
28
29
const logList = [];
function generateTaskByUserPromptWithPageScreen(prompt, { logList }) => {
return {
type: 'Planning',
subType: 'Plan',
locate: null,
param: {
prompt,
log: logList,
},
execute: () => {
const screenShot = screenShot();
return await callAiGetPlan(prompt, { log: logList.join('-'), screenShot });
}
}
}
let planningTask = generateTaskByUserPromptWithPageScreen(prompt);
while (planningTask) {
const planResult = planningTask.execute();
const { log, more_actions_needed_by_instruction, actions } = planResult;
const newTasks = convertPlanToExecutable(actions); // 'Tap' | 'Hover' 等等
newTasks.execute();
logList.push(log);
if (more_actions_needed_by_instruction) {
planningTask = generateTaskByUserPromptWithPageScreen(prompt, {log: logList.join('-')});
} else {
break;
}
}

Midscene.js的缺点是什么

  1. 成本
    豆包和千问VL的计费都是输入:3元/百万token,输出:9元/百万token,像我们上述的调用输入是2400token,输出是100token,
    上述的一个问题调用了两次AI,大概3元可以问150个问题,我觉得还能接受。
  2. 准确程度
    Midscene.js是视觉分析得到元素的bounding box来获取元素的,可能会不准
  3. 运行速度
    上述问题在本地调用两次”qwen-vl-max-latest”模型AI花用了15-20秒,时间稍长,但是一般都是异步任务也能接受。
  4. 一些操作没法实现
    目前还不支持拖拽、双击、文件上传等等。
  5. 假如目标元素不在首屏,就无法定位元素。

总结

后续将会对比下和Playwright MCP的区别。

附上plan的prompt

System Prompt

1
2
3
4
5
6
7
8
9
10
11
12
13
14
15
16
17
18
19
20
21
22
23
24
25
26
27
28
29
30
31
32
33
34
35
36
37
38
39
40
41
42
43
44
45
46
47
48
49
50
51
'Target: User will give you a screenshot, an instruction and some previous logs indicating what have been done. Please tell what the next one action is (or null if no action should be done) to do the tasks the instruction requires. 

Restriction:
- Don\'t give extra actions or plans beyond the instruction. ONLY plan for what the instruction requires. For example, don\'t try to submit the form if the instruction is only to fill something.
- Always give ONLY ONE action in `log` field (or null if no action should be done), instead of multiple actions. Supported actions are Tap, Hover, Input, KeyboardPress, Scroll.
- Don\'t repeat actions in the previous logs.
- Bbox is the bounding box of the element to be located. It\'s an array of 4 numbers, representing 2d bounding box as [xmin, ymin, xmax, ymax].

Supporting actions:
- Tap: { type: "Tap", locate: {bbox: [number, number, number, number], prompt: string } }
- RightClick: { type: "RightClick", locate: {bbox: [number, number, number, number], prompt: string } }
- Hover: { type: "Hover", locate: {bbox: [number, number, number, number], prompt: string } }
- Input: { type: "Input", locate: {bbox: [number, number, number, number], prompt: string }, param: { value: string } } // Replace the input field with a new value. `value` is the final that should be filled in the input box. No matter what modifications are required, just provide the final value to replace the existing input value. Giving a blank string means clear the input field.
- KeyboardPress: { type: "KeyboardPress", param: { value: string } }
- Scroll: { type: "Scroll", locate: {bbox: [number, number, number, number], prompt: string } | null, param: { direction: \'down\'(default) | \'up\' | \'right\' | \'left\', scrollType: \'once\' (default) | \'untilBottom\' | \'untilTop\' | \'untilRight\' | \'untilLeft\', distance: null | number }} // locate is the element to scroll. If it\'s a page scroll, put `null` in the `locate` field.


Field description:
* The `prompt` field inside the `locate` field is a short description that could be used to locate the element.

Return in JSON format:
{
"what_the_user_wants_to_do_next_by_instruction": string, // What the user wants to do according to the instruction and previous logs.
"log": string, // Log what the next one action (ONLY ONE!) you can do according to the screenshot and the instruction. The typical log looks like "Now i want to use action \'{{ action-type }}\' to do .. first". If no action should be done, log the reason. ". Use the same language as the user\'s instruction.
"error"?: string, // Error messages about unexpected situations, if any. Only think it is an error when the situation is not expected according to the instruction. Use the same language as the user\'s instruction.
"more_actions_needed_by_instruction": boolean, // Consider if there is still more action(s) to do after the action in "Log" is done, according to the instruction. If so, set this field to true. Otherwise, set it to false.
"action":
{
// one of the supporting actions
} | null,
,
"sleep"?: number, // The sleep time after the action, in milliseconds.
}

For example, when the instruction is "click \'Confirm\' button, and click \'Yes\' in popup" and the log is "I will use action Tap to click \'Confirm\' button", by viewing the screenshot and previous logs, you should consider: We have already clicked the \'Confirm\' button, so next we should find and click \'Yes\' in popup.

this and output the JSON:

{
"what_the_user_wants_to_do_next_by_instruction": "We have already clicked the \'Confirm\' button, so next we should find and click \'Yes\' in popup",
"log": "I will use action Tap to click \'Yes\' in popup",
"more_actions_needed_by_instruction": false,
"action": {
"type": "Tap",
"locate": {
"bbox": [100, 100, 200, 200],
"prompt": "The \'Yes\' button in popup"
}
}
}
'

User prompt

1
`Here is the user's instruction:<instruction>  <high_priority_knowledge>    undefined  </high_priority_knowledge>  在搜索框输入 "耳机" ,敲回车</instruction>`

什么是Islands架构

Islands架构类似于微前端架构,但Islands主要是为了优化页面性能和用户体验,而微前端是为了解耦不同业务模块。

island

为什么要使用Islands

  1. 可以优先展示或者水合重要内容,比如电商商品详情页可以优先展示和水合商品主图、商品描述、购买按钮。
  2. 浏览器加载的js变少,能够提升TTI。

使用

Astro有很多指令表示一个组件是在服务端渲染还是客户端渲染、渲染时机。

directives description priority
client:load 页面加载后立即水合 high
client:idle 在requestIdleCallback中进行水合 medium
timeout 最大等待时间后水合 low
client:visible 进入视口后水合 low
client:media 媒体查询后水合 low
client:only 不进行服务端渲染 low
server:defer 按需渲染

可以使用这个astro的模版快速搭建一个demo

使用client:load标记组件为Island组件,并且高优先级水合

1
<BuyNowButton client:load onClick={handleClick}>点击购买</BuyNowButton>

原理

通过Astro的compiler将astro代码编译成如下

1
2
3
4
5
6
7
8
9
10
11
12
13
14
15
16
17
import { render as $$render, createAstro as $$createAstro, createComponent as $$createComponent, renderComponent as $$renderComponent } from "astro/compiler-runtime";
import BuyNowButton from "../components/BuyNowButton";
import { withBase } from "../utils";
const $$Astro = $$createAstro();
const Astro = $$Astro;
const $$Index = $$createComponent(($$result, $$props, $$slots) => {
const Astro2 = $$result.createAstro($$Astro, $$props, $$slots);
Astro2.self = $$Index;

return $$render`${$$renderComponent($$result, "BuyNowButton", BuyNowButton, {
"client:load": true,
"client:component-hydration": "load",
"client:component-path": "/with-nanostores/src/components/BuyNowButton",
"client:component-export": "default",
"data-astro-cid-j7pv25f6": true
})}`;
}, "/with-nanostores/src/pages/index.astro", void 0);

在renderComponent中会将标记为client:load的组件渲染成

1
<astro-island uid="Z1xkbrp" component-url="/src/components/BuyNowButton.tsx" component-export="default" renderer-url="/node_modules/.vite/deps/@astrojs_preact_client-dev__js.js?v=ec7158f6" props="{&quot;data-astro-cid-sckkx6r4&quot;:[0,true]}" client="load" before-hydration-url="/@id/astro:scripts/before-hydration.js" opts="{&quot;name&quot;:&quot;BuyNowButton&quot;,&quot;value&quot;:true}" server-render-time="1.461416999999983" await-children="" client-render-time="1"><aside hidden="" class="_container_jwp5b_1"><p>Your cart is empty!</p></aside></astro-island>

服务端返回的就是上面的html,并且会返回astro-island.js文件,该文件注册astro-island自定义元素,
该元素在connectCallback后获取astro dom上的component-url、renderer-url(hydrator水合器)和props。最后await hydrator(<Component {…props}/>)渲染组件

参考

https://jasonformat.com/islands-architecture/
https://docs.astro.build/zh-cn/concepts/why-astro/#_top

对比React常见的状态管理库context、Redux、MobX、zustand、jotai以及介绍它们的使用场景

context

context被创造出来就是为了解决prop drilling的问题,但是它存在重复渲染的问题,可以用https://github.com/dai-shi/use-context-selector解决这个问题,也可以不依赖任何库去解决use-context-selector

1
2
3
4
5
6
7
8
9
10
11
const ThemeContext = createContext('light');
const Main = ({ children }) => {
return (
<ThemeContext.Provider value={useState('light')}>
{children}
</ThemeContext.Provider>
)
}
function App() {
const theme = useContext(ThemeContext);
}

Redux + React-Redux

相对于context,redux是基于单向数据流,遵循不可变数据的原则性能较好易于调试、易于扩展、middleware支持、生态较好,开发调试devtool比较方便,但是上手成本高,需要理解单向数据流的概念。

1
2
3
4
5
6
7
8
9
10
11
12
13
14
15
16
17
18
19
20
21
22
23
24
25
26
27
28
29
30
31
32
33
34
35
36
37
38
39
40
41
42
43
44
45
export const counterSlice = createSlice({
name: 'counter',
initialState: {
value: 0,
},
reducers: {
increment: (state) => {
state.value += 1
},
decrement: (state) => {
state.value -= 1
},
incrementByAmount: (state, action) => {
state.value += action.payload
},
},
})
configureStore({
reducer: {
counter: counterSlice.reducer,
},
})
function Counter() {
const count = useSelector((state) => state.counter.value)
const dispatch = useDispatch()
return (
<div>
<div>
<button
aria-label="Increment value"
onClick={() => dispatch(increment())}
>
Increment
</button>
<span>{count}</span>
<button
aria-label="Decrement value"
onClick={() => dispatch(decrement())}
>
Decrement
</button>
</div>
</div>
)
}

zustand

相对于Redux有什么优势,参考官方

  1. zustand概念和使用上简单
  2. Redux要使用Provider
  3. zustand可以transient updates,就是组件能监听状态变更并且不造成重复渲染。
    1
    2
    3
    4
    5
    6
    7
    8
    9
    10
    11
    12
    13
    const useBearStore = create((set) => ({
    bears: 0,
    increasePopulation: () => set((state) => ({ bears: state.bears + 1 })),
    removeAllBears: () => set({ bears: 0 }),
    }))
    function BearCounter() {
    const bears = useBearStore((state) => state.bears)
    const increasePopulation = useBearStore((state) => state.increasePopulation)
    return (<div>
    <h1>{bears} around here ...</h1>
    <button onClick={increasePopulation}>one up</button>
    </div>)
    }

MobX

MobX通过透明的函数响应式编程使得状态管理变得简单和可扩展。MobX背后的哲学很简单: 任何源自应用状态的东西都应该自动地获得,其中包括UI、数据序列化等等,核心重点就是: MobX通过响应式编程实现简单高效,可扩展的状态管理。

相对于react-redux,MobX的优势主要在开发简单,不用太多样板代码,但是因为状态可以在多处修改导致追踪状态比较麻烦,并且MobX不需要selector就能避免re-reneder,设置值的方式也不需要像Zustand那样必须要set(state => newState),更符合直觉,体验更好

1
2
3
4
5
6
7
8
9
10
11
12
13
14
15
class Timer {
secondsPassed = 0
constructor() {
makeAutoObservable(this)
}
increaseTimer() {
this.secondsPassed += 1
}
}
const myTimer = new Timer()
const TimerView = observer(({ timer }) => <span>Seconds passed: {timer.secondsPassed}</span>)
ReactDOM.render(<TimerView timer={myTimer} />, document.body)
setInterval(() => {
myTimer.increaseTimer()
}, 1000)

jotai

jotai上手简单,生态较完善,并且DX比较不错,使用不需要层层传递props,而且不像Context会重复渲染,缺点在复杂应用中状态太多不好管理,需要在上层封装Model、Controller层。

1
2
3
4
5
6
7
8
9
10
11
12
13
14
15
16
17
18
19
20
21
22
23
24
25
26
27
28
29
import { Suspense } from 'react'
import { atom, useAtom } from 'jotai'
// 定义原子状态
const userIdAtom = atom(1)
// 派生状态
const userAtom = atom(async (get, { signal }) => {
const userId = get(userIdAtom)
const response = await fetch(
`https://jsonplaceholder.typicode.com/users/${userId}?_delay=2000`,
{ signal },
)
return response.json()
})
const Controls = () => {
// 使用atom
const [userId, setUserId] = useAtom(userIdAtom)
return (
<div>
User Id: {userId}
<button onClick={() => setUserId((c) => c - 1)}>Prev</button>
<button onClick={() => setUserId((c) => c + 1)}>Next</button>
</div>
)
}

const UserName = () => {
const [user] = useAtom(userAtom)
return <div>User name: {user.name}</div>
}

valtio

updating…

何时使用

Context + reducer

不想依赖第三方库,项目比较简单

MobX

快速开发和快速PMF,中大型项目也可以

zustand

快速开发和快速PMF,中大型项目也可以,需要undo/redo

React-Redux

项目复杂,需要长期维护,undo/redo

jotai

中小型项目

参考资料

https://medium.com/@brechtcorbeel/understanding-the-core-principles-of-react-a-comprehensive-introduction-cb56f0435ea1
https://medium.com/@padmagnanapriya/state-management-in-react-comparing-context-api-redux-0403748a241f
https://juejin.cn/post/6973977847547297800?searchId=20250421092546DCBB5357F0DDC339B843#heading-11
https://cn.redux.js.org/faq/immutable-data/#what-are-the-benefits-of-immutability

假如通过splitChunks分出了多个initialChunk,Webpack如何保证这些产物的加载顺序?下文参考这个仓库,构建产物包含app.js和vendors.js。webpack如何保证在下载了vendors.js之后才执行app.js相关的模块代码?

app.js中有如下代码

1
2
3
4
// 表示在下载完vendors之后再require入口文件
var __webpack_exports__ = __webpack_require__.O(undefined, ["vendors"], function() {
return __webpack_require__("./client/src/entry.tsx");
})

webpack通过JSONP的方式加载chunk,__webpack_require__.O 是webpack管理runtime chunk加载的函数,会将entry所依赖的chunk以及dependency chunk loaded callback记录到deferred数组中,dependency chunk加载完成后便执行callback。

1
2
3
4
5
6
7
8
9
10
11
12
13
14
15
16
17
18
19
20
21
22
23
24
25
26
27
28
29
30
31
32
33
34
35
36
37
38
39
40
41
42
43
!function() {
var deferred = [];
__webpack_require__.O = function(result, chunkIds, fn, priority) {
// 添加webpackPrefetch: true注释会添加priority
if (chunkIds) {
priority = priority || 0;
// priority越大越靠前
for (var i = deferred.length; i > 0 && deferred[i - 1][2] > priority; i--)
deferred[i] = deferred[i - 1];
// 将依赖的chunkid和加载完成之后的callback加入到deferred中。
deferred[i] = [chunkIds, fn, priority];
return;
}
var notFulfilled = Infinity;
for (var i = 0; i < deferred.length; i++) {
var chunkIds = deferred[i][0];
var fn = deferred[i][1];
var priority = deferred[i][2];
var fulfilled = true;
for (var j = 0; j < chunkIds.length; j++) {
if ((priority & 1 === 0 || notFulfilled >= priority) && Object.keys(__webpack_require__.O).every(function(key) {
// 判断依赖的chunk是否加载到内存中
return __webpack_require__.O[key](chunkIds[j]);
})) {
chunkIds.splice(j--, 1);
} else {
fulfilled = false;
if (priority < notFulfilled)
notFulfilled = priority;
}
}
// 关联的chunks都下载完成
if (fulfilled) {
deferred.splice(i--, 1)
// 执行回调
var r = fn();
if (r !== undefined)
result = r;
}
}
return result;
};
}();

chunk加载

vendors.js下载完执行时会调用window[chunkLoadingGlobal].push相关模块。

vendors.js内容

chunkLoadingGlobal这个键名可以通过output.chunkLoadingGlobal更改。window[chunkLoadingGlobal]是在app.js中实现的(假如webpack配置开启了optimization.runtimeChunk,则在单独的runtimeChunk.js文件中),将chunk相关的modules添加到全局模块缓存后,会check一遍deferred数组中是否有需要执行的callback,我们这个例子中就是执行entry.js

1
2
3
4
5
6
7
8
9
10
11
12
13
14
15
16
17
18
19
20
21
22
23
24
25
26
27
28
29
30
31
32
33
34
35
36
37
38
39
40
41
42
43
/**
* @param parentChunkLoadingFunction 旧的push方法,一般是Array.prototype.push
* @param data [[vendors.js], {'/node_modules/axios/index.js': module}]
*/
var webpackJsonpCallback = function(parentChunkLoadingFunction, data) {
var chunkIds = data[0];
var moreModules = data[1];
var runtime = data[2];
var moduleId, chunkId, i = 0;
if (chunkIds.some(function(id) {
return installedChunks[id] !== 0;
})) {
for (moduleId in moreModules) {
// hasOwnProperty
if (__webpack_require__.o(moreModules, moduleId)) {
// 添加modules到webpack模块缓存中
__webpack_require__.m[moduleId] = moreModules[moduleId];
}
}
if (runtime) {
// 暂时不知道用来处理什么场景
var result = runtime(__webpack_require__);
}
}
if (parentChunkLoadingFunction) {
// push到window[chunkLoadingGlobal]中
parentChunkLoadingFunction(data);
}
for (; i < chunkIds.length; i++) {
chunkId = chunkIds[i];
if (__webpack_require__.o(installedChunks, chunkId) && installedChunks[chunkId]) {
// resolve 异步加载的chunk
installedChunks[chunkId][0]();
}
// 标记为chunk依赖的module都已添加到缓存
installedChunks[chunkId] = 0;
}
// 将所有module添加到内存后,check一下deferred是否有需要执行的callback
return __webpack_require__.O(result);
}
var chunkLoadingGlobal = self["webpackChunkmobx"] = self["webpackChunkmobx"] || [];
chunkLoadingGlobal.forEach(webpackJsonpCallback.bind(null, 0));
chunkLoadingGlobal.push = webpackJsonpCallback.bind(null, chunkLoadingGlobal.push.bind(chunkLoadingGlobal));

Optimize.RuntimeChunk配置的作用

将运行时模块管理相关的代码从app.js中抽离出来,有利于缓存。因为线上环境vendors文件名都会带有hash,假如vendors内容改了导致hash改了,app.js也得做变更,影响网页性能。

1
2
3
4
// app.js
var __webpack_exports__ = __webpack_require__.O(undefined, ["vendors"], function() {
return __webpack_require__("./client/src/entry-client.tsx");
})

介绍

loadable-components是React动态加载的库,支持组件/库懒加载、动态引入。

对比 React.lazy

Library Suspense SSR Library Splitting 支持动态岛入import(./${value})
React.lazy ✅ (18)
@loadable/component

@loadable/component在React18未发布之前比较有优势,因为在React18之前使用动态分割需要自己实现lazyLoad高阶组件,Library分割和动态导入平常我也不怎么使用,且自己用import也能快速解决需求。所以@loadable/component在React18发布之后优势不那么大了,但是了解它的实现原理对提升技术还是比较有帮助的。

loadable-components的使用

lazy Component

1
2
3
4
5
6
7
8
9
10
11
12
13
14
15
16
import loadable, {lazy} from '@loadable/component'
const Comp = loadable(() => import(`./Comp`))
function App() {
return (
<Comp />
)
}

// or
// use lazy with suspense
const Comp = lazy(() => import(`./Comp`))
function App() {
return (
<Suspense fallback='loading...'><Comp /></Suspense>
)
}

lazy library

1
2
3
4
5
6
7
8
const Moment = loadable.lib(() => import('moment'), {
resolveComponent: moment => moment.default || moment,
})
function App() {
return (
<Moment>{moment => moment().format('HH:mm')}</Moment>
)
}

服务端渲染时,在loadableReady之后进行hydrate/hydrateRoot并且需要引入@loadable/babel-plugin、@loadable/server和@loadable/webpack-plugin

1
2
3
4
5
6
7
8
9
10
11
12
13
14
15
16
17
18
19
20
21
22
23
24
25
26
27
28
29
30
31
32
33
34
// client.js
loadableReady(() => {
const root = document.getElementById('main')
hydrate(<App />, root)
})

// webpack.config
new LoadablePlugin({ filename: 'loadable-stats.json', writeToDisk: true })

// server.js
import { ChunkExtractor } from '@loadable/server'
const statsFile = path.resolve('./loadable-stats.json')
const nodeExtractor = new ChunkExtractor({ statsFile })
const { default: App } = nodeExtractor.requireEntrypoint()

const webExtractor = new ChunkExtractor({ statsFile })
const jsx = webExtractor.collectChunks(<App />)

const html = renderToString(jsx)

res.set('content-type', 'text/html')
res.send(`
<!DOCTYPE html>
<html>
<head>
${webExtractor.getLinkTags()}
${webExtractor.getStyleTags()}
</head>
<body>
<div id="main">${html}</div>
${webExtractor.getScriptTags()}
</body>
</html>
`)

源码解析

lazy Component

loadable源码结构大致如下,核心构造函数createLoadable返回loadable和lazy函数

1
2
3
4
5
6
7
8
9
10
11
12
13
14
15
16
17
18
19
20
21
22
23
24
25
26
27
28
29
30
31
32
33
34
35
36
37
38
39
40
41
42
43
44
45
46
47
48
49
50
51
52
53
54
55
56
57
58
59
60
61
62
63
64
65
66
67
68
69
70
71
72
73
74
75
76
77
78
79
80
81
const { loadable, lazy } = createLoadable({
render({ result: Component, props }) {
return <Component {...props} />
},
})
function createLoadable({
render,
onLoad,
}) {
function loadable(loadableConstructor, options = {}) {
function getCacheKey(props) {}
function resolve(module, props, Loadable){}
const cachedLoad = props => {}
class InnerLoadable extends React.Component {
constructor(props) {
super(props)

this.state = {
result: null,
error: null,
loading: true,
cacheKey: getCacheKey(props),
}
// server side
if (props.__chunkExtractor) {
// initial chunks
if (options.ssr === false) {
return
}
ctor.requireAsync(props).catch(() => null)
// initial chunks 直接require
this.loadSync()
props.__chunkExtractor.addChunk(ctor.chunkName(props))
return
}
// client side
if (
options.ssr !== false &&
// is ready - was loaded in this session
((ctor.isReady && ctor.isReady(props)) ||
// is ready - was loaded during SSR process
(ctor.chunkName &&
LOADABLE_SHARED.initialChunks[ctor.chunkName(props)]))
) {
// 假如是initialChunks直接加载,防止mismatch
this.loadSync()
}
}
render() {
if (options.suspense) {
const cachedPromise = this.getCache() || this.loadAsync()
if (cachedPromise.status === STATUS_PENDING) {
// throw 给外层的Suspense
throw this.loadAsync()
}
}
if (error) {
// throw to ErrorBoundry
throw error
}
const fallback = propFallback || options.fallback || null
if (loading) {
return fallback
}
return props.render()
}
}
const EnhancedInnerLoadable = withChunkExtractor(InnerLoadable);
const Loadable = React.forwardRef((props, ref) => (
// 转发forwardedRef
<EnhancedInnerLoadable forwardedRef={ref} {...props} />
))
return Loadable;
}

function lazy(ctor, options) {
// 添加suspense:true,InnerLoadable会throw promise给外层的Suspense组件
return loadable(ctor, { ...options, suspense: true })
}
return { loadable, lazy }
}

componentDidMount处理客户端异步加载和渲染loading fallback。

1
2
3
4
5
6
7
8
9
10
11
12
13
14
15
16
17
18
19
20
21
22
23
24
25
26
27
28
29
30
31
32
33
34
35
36
37
38
39
40
41
42
componentDidMount() {
this.mounted = true
// component might be resolved synchronously in the constructor
if (this.state.loading) {
this.loadAsync()
}
}
loadAsync() {
const promise = this.resolveAsync();
promise
.then(loadedModule => {
const result = resolve(loadedModule, this.props, Loadable)
this.safeSetState(
{
result,
loading: false,
},
() => this.triggerOnLoad(),
)
})
.catch(error => this.setState({ error, loading: false }))
return promise
}
render() {
if (options.suspense) {
// 如果suspense是true,throw promise,外层的Suspense接收
const cachedPromise = this.getCache() || this.loadAsync()
if (cachedPromise.status === STATUS_PENDING) {
throw this.loadAsync()
}
}
const fallback = propFallback || options.fallback || null
if (loading) {
return fallback
}
return render({
fallback,
result,
options,
props: { ...props, ref: forwardedRef },
})
}

lazy lib

相比于Component多了onLoad方法,支持让组件使用者调用通过ref.current获取库的方法

1
2
3
4
5
6
7
8
9
10
11
12
13
14
15
16
17
18
19
const { loadable, lazy } = createLoadable({
onLoad(result, props) {
// 这里的result就是import('moment')的返回值
if (result && props.forwardedRef) {
if (typeof props.forwardedRef === 'function') {
props.forwardedRef(result)
} else {
props.forwardedRef.current = result
}
}
},
render({ result, props }) {
if (props.children) {
// <Moment>{({ default: moment }) => moment(date).fromNow()}</Moment>
return props.children(result)
}
return null
},
})

重点是SSR相关的实现

loadableReady

在服务端渲染时,需要在loadableReady的callback进行hydrate,loadableReady的回调时机是在所有initial chunks加载完成之后,如何实现呢?

主要通过@loadable/webpack-plugin和@loadable/babel-plugin配合实现
@loadable/webpack-plugin
负责将chunkLoadingGlobal键名改为自定义的名称,输出stats file,该文件包含所有的chunk信息。

1
2
3
4
5
6
7
8
9
10
11
12
13
14
15
16
17
18
19
20
21
22
23
24
25
26
27
28
29
30
31
32
33
34
35
36
37
38
39
40
41
class LoadablePlugin {
constructor({
filename = 'loadable-stats.json',
path,
writeToDisk,
outputAsset = true,
chunkLoadingGlobal = '__LOADABLE_LOADED_CHUNKS__',
} = {}) {
this.opts = { filename, writeToDisk, outputAsset, path, chunkLoadingGlobal }
// The Webpack compiler instance
this.compiler = null
}
apply(compiler) {
this.compiler = compiler
const version = 'jsonpFunction' in compiler.options.output ? 4 : 5
// Add a custom chunk loading callback
compiler.options.output.chunkLoadingGlobal = this.opts.chunkLoadingGlobal
compiler.hooks.make.tap(name, compilation => {
compilation.hooks.processAssets.tap(
{
name,
stage: compiler.webpack.Compilation.PROCESS_ASSETS_STAGE_REPORT,
},
() => {
const asset = this.handleEmit(compilation)
if (asset) {
// 输出stats file,里面包含了chunkGroup,SSR和loadaleReady都需要用到
compilation.emitAsset(this.opts.filename, asset)
}
},
)
})
}
handleEmit = compilation => {
const stats = compilation.getStats().toJson();
const result = JSON.stringify(stats, null, 2)
if (this.opts.writeToDisk) {
this.writeAssetsFile(result)
}
}
}

ChunkExtractorManager
ChunkExtractorManager负责抽取initialChunk,每个loadable组件由withChunkExtractor包裹,在组件构造函数中将该组件依赖的chunk添加到__chunkExtractor中

1
2
3
4
5
6
7
8
9
10
11
12
13
14
15
16
17
18
19
20
21
22
23
24
25
26
const ChunkExtractorManager = ({ extractor, children }) => (
<Context.Provider value={extractor}>{children}</Context.Provider>
)
const withChunkExtractor = Component => {
const LoadableWithChunkExtractor = props => (
<Context.Consumer>
{extractor => <Component __chunkExtractor={extractor} {...props} />}
</Context.Consumer>
)
return LoadableWithChunkExtractor
}
const EnhancedInnerLoadable = withChunkExtractor(InnerLoadable)
const Loadable = React.forwardRef((props, ref) => (
<EnhancedInnerLoadable forwardedRef={ref} {...props} />
))
class InnerLoadable extends React.Component {
constructor(props) {
super(props)
this.state = {}
// Server-side
if (props.__chunkExtractor) {
props.__chunkExtractor.addChunk(ctor.chunkName(props))
return
}
}
}

ctor.chunkName从哪里来?

@loadable/babel-plugin会将组件编译成如下代码,给组件添加chunkName、resolve、importAsync等等。

1
2
3
4
5
6
7
8
9
10
11
12
13
14
15
16
17
18
19
20
21
22
23
24
25
26
27
28
29
30
31
32
33
34
35
36
37
38
39
40
41
var A = Object(_loadable_component__WEBPACK_IMPORTED_MODULE_1__["default"])({
resolved: {},
chunkName: function chunkName() {
return "letters-A".replace(/[^a-zA-Z0-9_!§$()=\-^°]+/g, "-");
},
isReady: function isReady(props) {
var key = this.resolve(props);
if (this.resolved[key] !== true) {
return false;
}
if (true) {
return !!__webpack_require__.m[key];
}
return false;
},
importAsync: function importAsync() {
return Promise.all(/*! import() | letters-A */[__webpack_require__.e("vendors~letters-A~letters-B"), __webpack_require__.e("letters-A")]).then(__webpack_require__.bind(null, /*! ./letters/A */ "./src/client/letters/A.js"));
},
requireAsync: function requireAsync(props) {
var _this = this;
var key = this.resolve(props);
this.resolved[key] = false;
return this.importAsync(props).then(function (resolved) {
_this.resolved[key] = true;
return resolved;
});
},
requireSync: function requireSync(props) {
var id = this.resolve(props);
if (true) {
return __webpack_require__(id);
}
return eval('module.require')(id);
},
resolve: function resolve() {
if (true) {
return /*require.resolve*/(/*! ./letters/A */ "./src/client/letters/A.js");
}
return eval('require.resolve')("./letters/A");
}
});

chunks收集完了之后便可以通过extractor.getLinkTags()和extractor.getStyleTags()获取scripts和styles,写入html返回给浏览器。

1
2
3
4
5
6
7
8
9
10
11
12
13
14
15
16
17
18
19
20
21
22
23
24
app.get('*', (req, res) => {
const nodeExtractor = new ChunkExtractor({ statsFile: nodeStats })
const { default: App } = nodeExtractor.requireEntrypoint()

const webExtractor = new ChunkExtractor({ statsFile: webStats })
const jsx = webExtractor.collectChunks(<App />)

const html = renderToString(jsx)

res.set('content-type', 'text/html')
res.send(`
<!DOCTYPE html>
<html>
<head>
${webExtractor.getLinkTags()}
${webExtractor.getStyleTags()}
</head>
<body>
<div id="main">${html}</div>
${webExtractor.getScriptTags()}
</body>
</html>
`)
})

webExtractor.getScriptTags里包含的是main.js以及chunks string,chunks string后续会在loadableReady中用到。

1
2
`<script id="${id}" ${props}>${this.getRequiredChunksScriptContent()}</script>`,
`<script id="${id}_ext" ${props}>${this.getRequiredChunksNamesScriptContent()}</script>`,

loadableReady
获取Client依赖的chunks,重写window[chunkLoadingGlobal].push方法,对比当前window[chunkLoadingGlobal](已经加载的chunks)和 requiredChunks 判断依赖的chunks是否加载完成,完成之后执行loadableReady的callback

1
2
3
4
5
6
7
8
9
10
11
12
13
14
15
16
17
18
19
20
21
22
23
24
25
26
27
28
29
30
31
32
33
34
35
36
37
function loadableReady(
done = () => {},
{ namespace = '', chunkLoadingGlobal = '__LOADABLE_LOADED_CHUNKS__' } = {},
) {
let requiredChunks = null
if (!requiredChunks) {
done()
return Promise.resolve()
}

let resolved = false
return new Promise(resolve => {
window[chunkLoadingGlobal] = window[chunkLoadingGlobal] || []
const loadedChunks = window[chunkLoadingGlobal]
const originalPush = loadedChunks.push.bind(loadedChunks)

function checkReadyState() {
if (
requiredChunks.every(chunk =>
loadedChunks.some(([chunks]) => chunks.indexOf(chunk) > -1),
)
) {
if (!resolved) {
resolved = true
resolve()
}
}
}

loadedChunks.push = (...args) => {
originalPush(...args)
checkReadyState()
}

checkReadyState()
}).then(done)
}

总结

分析loadable-components的源码还是能收获不少东西的,也有一些值得深入的比如@loadable/babel-plugin如何实现,后续我还会分析React18 SSR Streaming以及Suspense的实现方式。

0%